Step #1: Add or Edit the Email Account
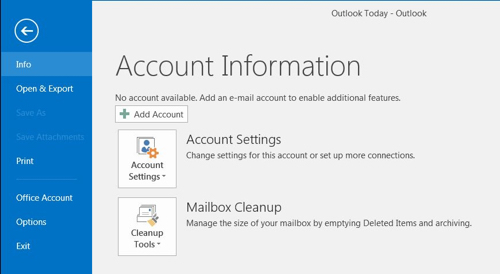
To set up a new email account, click the File tab and then click Add Account.
If you’re modifying the settings on an existing account already configured in Outlook, click on Account Settings and then click on Change settings for this account or set up more connections and skip ahead to Step #4: Modifying an Existing Account.
Step #2: Manual Setup for a New Email Account 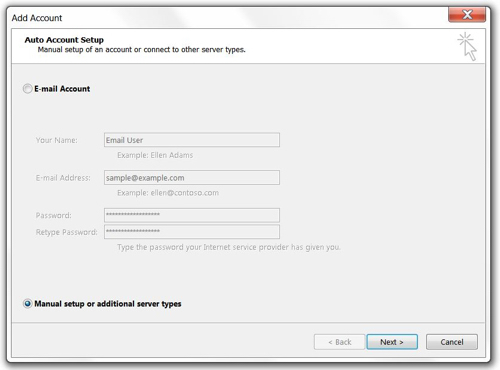
Select the radio button for Manual setup or additional server types.
Then click Next.
Step #3: Select Email Account Type
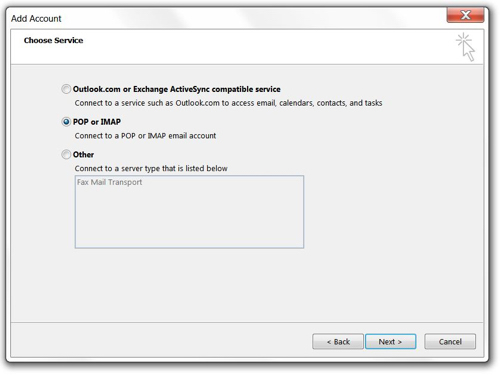
Select the radio button for POP or IMAP.
And then click Next.
Step #4: Modifying an Existing Account
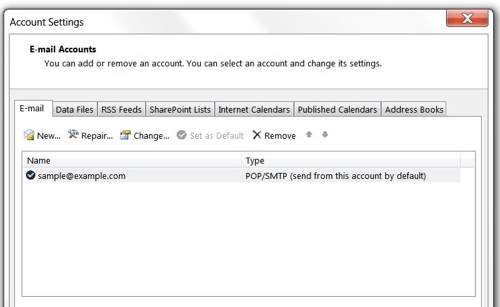
If you’re editing an email account that already has been configured in Outlook, click on the account name and then click on the Change button. Otherwise, skip ahead to Step #5: Configure General Settings.
To avoid data loss, please use caution any time you change an email account’s connection type or delete an email account. Removing an email account from a mail client also will remove all messages associated with it on the device and, specifically in the case of POP accounts that are not configured to retain mail on the server, there may be no way to recover those messages.
Note: You cannot edit an existing email account to switch its account type from POP3 to IMAP or vice versa. To change the account type, you must add a new account of the desired type (POP3 or IMAP) per the Add or edit the email account instructions above. Adding a new account with a different connection type should not require you to delete the old one in most mail clients.
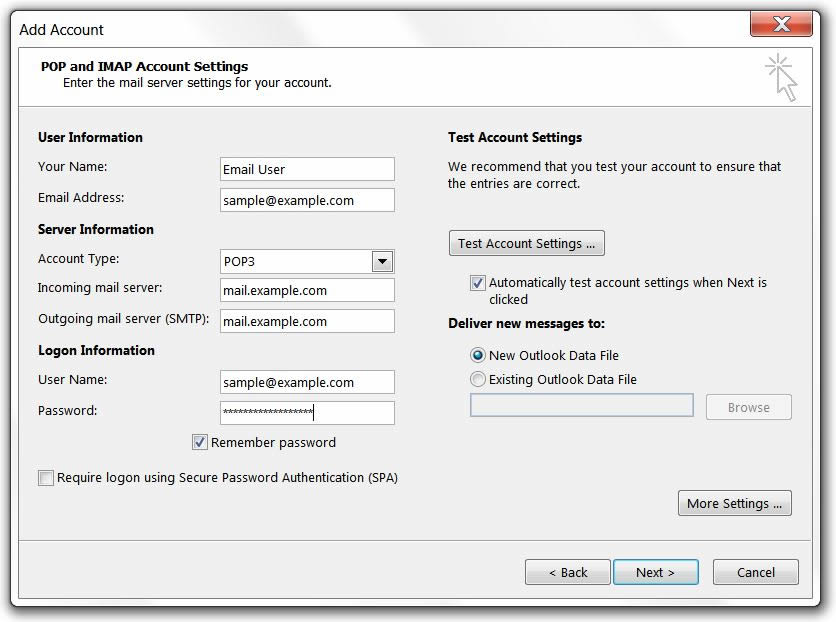
Step #5: Configure General Settings
Your Name is your name as you want it to appear in emails that you send
Email Address should be the full email address
Account Type will be POP3
Incoming mail server: When using standard (non-SSL) settings, use mail.4cdg.com
Outgoing mail server (SMTP): When using standard (non-SSL) settings, use mail.4cdg.com
User Name is your full email address, not just the part before the at symbol.
Password is the email account password.
Require logon using Secure Password Authentication (SPA) must not be checked.
Step #6: Configure Outgoing Server Settings
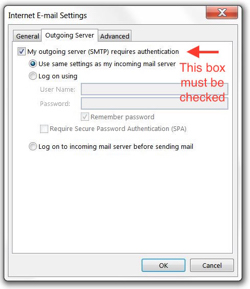
Click the More Settings button, and select the Outgoing Server tab.
My outgoing server (SMTP) requires authentication should be checked
Use same settings as my incoming mail server should be enabled
Log on to incoming mail server before sending mail (POP3 only) should not be enabled. Now select the Advanced tab at the top of the More Settings window.
Step #7: Configure Ports and Encryption
Fill in the Advanced settings using the images and instructions below.
Once complete, click OK to return to the previous window.
Standard (Non-SSL) POP3 Settings
Incoming server (POP3) is port 110
This server requires an encrypted connection (SSL) is not checked
Outgoing server (SMTP) is port 25 (587 also can be used if needed)
Use the following type of encrypted connection is “None”
Step #8: Test Settings
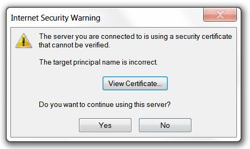
Click the Next button to make a connection to the server and test the configuration.
If you get a popup warning, you will need to click the Yes button to accept the certificate and proceed.
Once you click Yes, Outlook will test the connection settings.
When you see the success message, you’re ready to start using your email address with Outlook 2016.